
CodeProject
A few days ago, Rich Dunbar wrote a post about how to get started with with Windows Phone Development and the post went freaking viral. Now the reason here is that Rich, in his spare time, sponsors and host events for Nokia in order to promote Windows Phone Development and as a a reward will get you a Nokia Device and App Hub Token. A pretty nice prize for learning how to write apps for Windows Phone.
The post is a pretty good resource on where to get what you need to get started and how to get the prize. Here is an excert...
Every time I tweet about new Windows Phone developers being able to receive a free Microsoft App Hub registration token (a $99 value) and a sweet Nokia Lumia dev device (currently I have Lumia 800's), I get a lot of "I sure wish I could make an app" responses. So I am writing this post to help you know just where to start and what tools are available to help you be successful in a hurry.
Step 1: Download and install the necessary SDK, SDK update and Silverlight tool kit for Windows Phone development.
WP7 SDK 7.1: http://www.microsoft.com/en-us/download/details.aspx?displaylang=en&id=27570
WP7 SDK 7.1.1 Update: http://www.microsoft.com/en-us/download/details.aspx?id=29233
Silverlight for Windows Phone Toolkit: http://silverlight.codeplex.com/releases/view/75888
Step 2: Bookmark or favorite the following sites for resources, code samples, tutorials, templates, icons and many other things to help you get started and continue developing. > ...Read more
In Orlando on the 10th of August, he is hosting an event that covers a lot if not all of the post step by step. Sign up here if you're in that area: Nokia Meetup - Orlando, FL | Aug 10, 2012 - Meetup http://bit.ly/NHchzF .
What I wanted to do with this post is give you what I think is another need to know when developing Windows Phone Applications and that's the MVVM design pattern using MVVM Light by Laurent Bugnion. So, here goes.
There are a few other MVVM Frameworks available, but this by far is my favorite and in fact was also used by Amazon in their Kindle for Windows Phone application.
Start by going here and installing the latest version, this will install the templates within Visual Studio and what you'll need to complete the steps in this walk through as well as future applications I look forward to seeing.
Creating the Application
Open Visual Studio (I'm using 2010 for this), select New Project and in the Installed Templates you'll see MVVMLight(WP71).
| [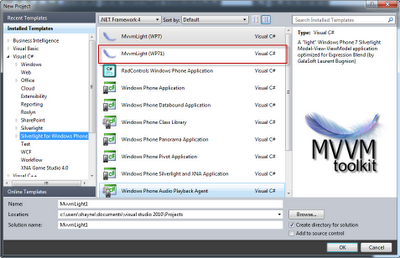](http://1.bp.blogspot.com/-24_Pe0F4OCI/UAbCOvZ8rCI/AAAAAAAAAGk/fBLmBOl3b88/s1600/7-18-2012+9-58-40+AM.png) |
| You'll notice that MVVM Light supports WP7 and WP7.1, it also supports Windows 8 too! |
Connecting the View and the View-Model
First let's look at the View. Open MainPage.xaml, and take a look at line 17. The most important piece of MVVM is setting the DataContext of the View. This allows the View to know where to look for its data or bindings.
<phone:PhoneApplicationPage x:Class="MvvmLight1.MainPage"
                            xmlns="http://schemas.microsoft.com/winfx/2006/xaml/presentation"
                            xmlns:x="http://schemas.microsoft.com/winfx/2006/xaml"
                            xmlns:phone="clr-namespace:Microsoft.Phone.Controls;assembly=Microsoft.Phone"
                            xmlns:shell="clr-namespace:Microsoft.Phone.Shell;assembly=Microsoft.Phone"
                            xmlns:d="http://schemas.microsoft.com/expression/blend/2008"
                            xmlns:mc="http://schemas.openxmlformats.org/markup-compatibility/2006"
                            FontFamily="{StaticResource PhoneFontFamilyNormal}"
                            FontSize="{StaticResource PhoneFontSizeNormal}"
                            Foreground="{StaticResource PhoneForegroundBrush}"
                            SupportedOrientations="Portrait"
                            Orientation="Portrait"
                            mc:Ignorable="d"
                            d:DesignWidth="480"
                            d:DesignHeight="768"
                            shell:SystemTray.IsVisible="True"
                            DataContext="{Binding Main, Source={StaticResource Locator}}">
You'll notice that instead of binding to an object directly, the DataContext is set to a StaticResource Property called **_Main _**within Locator. We'll put that aside for now until we cover the rest of the information here in the view.
Next, if you move down to line 32, you'll see where the view is binding to properties in the View-Model.
<StackPanel x:Name="TitlePanel"
            Grid.Row="0"
            Margin="24,24,0,12">
    <TextBlock x:Name="ApplicationTitle"
               Text="{Binding ApplicationTitle}"
               Style="{StaticResource PhoneTextNormalStyle}" />
    <TextBlock x:Name="PageTitle"
               Text="{Binding PageName}"
               Margin="-3,-8,0,0"
               Style="{StaticResource PhoneTextTitle1Style}" />
</StackPanel>

<Grid x:Name="ContentGrid"
      Grid.Row="1">

    <TextBlock Text="{Binding Welcome}"
               Style="{StaticResource PhoneTextNormalStyle}"
               HorizontalAlignment="Center"
               VerticalAlignment="Center"
               FontSize="40" />
</Grid>
By setting the Text property equal to {Binding Welcome} for example it is telling the view to get the value from the View-Model which is subsequently set in the DataContext of the View as stated above. So in looking at ViewModel/MainViewModel.cs in the solution explorer you'll see that that value is set to_ "Welcome to MVVM Light"_.
public string Welcome
        {
            get
            {
                return "Welcome to MVVM Light";
            }
        }
ViewModelLocator
Ok, so back to the ViewModelLocator. This class is the air traffic controller, if you will, of linking up your views with the view models, well that's how I look at it anyway. It's responsible for creating and disposing of all of your View-Models, and although it is not the only way to do this; it is the way MVVM Light does it.One thing that I'll state is that other than adding additional views, I almost never touch the ViewModelLocator code, it's thoughtless when it comes to the core app development.
The application sets a resource in App.xaml as shown below: <application.resources> <vm:viewmodellocator x:key="Locator" d:isdatasource="True"> </vm:viewmodellocator></application.resources>Seems pretty cut and dry. BUT where a majority of the examples I have seen concerning MVVM Light stop is right here. Other that some specific how to do this or that, I think they fall short for the beginner. So, the next step is adding an additional page. So let's move on... Adding a Second PageFor the sake of organization and keeping a little sanity when getting into large applications let's add a new folder called "View". Next, right click and select Add -> New Item. You'll see now that within the Add Item Dialog you have a few options for MVVM Light as well as the traditional add items.Select MvvmView (WP7) and name it SecondPageView.xaml and click ok. You'll notice that the structure, DataContext, etc is exactly the same of MainPage.xaml, essentially it's a template and easy to change.Next, we will add a new View-Model. So, right click the ViewModel folder and select Add->New Item->MvvmViewModel (WP7), name the View-Model "SecondPageViewModel.cs" and click Add.In order to wire up the new View and View-Model we must open up the ViewModelLocator.cs class and take advantage of the snippets that MVVM Light gives us to do so and then do a little clean up.Go to just above the constructor and type in the following and hit enter -> _mvvmlocatorproperty_What this snippet does is add the following items to the class.
private static ViewModelType _viewModelPropertyName;Now the snippet will highlight the **ViewModelType **identifier first and you will want to change this to **SecondPageViewModel**, then hit tab. Second, change the **_viewModelPropetyName **to **_viewModelSecondPage **and hit tab. Finally, you will be navigated to the comment portion for the **ViewModelPropertyName **and change this to **SecondPageViewModel**. When you are done it should look like this.../// <summary> /// Gets the ViewModelPropertyName property. /// </summary> public static ViewModelType ViewModelPropertyNameStatic { get { if (_viewModelPropertyName == null) { CreateViewModelPropertyName(); } return _viewModelPropertyName; } }
private static SecondPageViewModel _viewModelSecondPage;

        ///
        /// Gets the ViewModelSecondPage property.
        ///
        public static SecondPageViewModel ViewModelSecondPageStatic
        {
            get
            {
                if (_viewModelSecondPage == null)
                {
                    CreateViewModelSecondPage();
                }

                return _viewModelSecondPage;
            }
        }
Ok, now a little work to do to make this addition complete. Need to add " CreateViewModelSecondPage();" to the constructor just under "CreateMain();". This ensures that the instance of the new View-Model is created.
Next, one draw back is that the snippet creates a duplicate of "Cleanup()", so if you get the following error:
Type 'MvvmLight1.ViewModel.ViewModelLocator' already defines a member called 'Cleanup' with the same parameter typesYou'll need to also move the contents of the duplicated method to the existing Cleanup method. In our case, the contents are " ClearViewModelSecondPage();".Last step, go to the SecondPageView.xaml and change the value in the DataContext to the new ViewModel.from:DataContext="{Binding ViewModelName, Source={StaticResource Locator}}">to:DataContext="{Binding SecondPageViewModel, Source={StaticResource Locator}}">Part 2 we'll see how to add a button on the first page to navigate to the second page which will cover navigation and messaging. Download code for Part 1 here