

I have been following the Angular 2 and ASP.NET Core stories pretty close over the past year, and of course not ignoring Docker. I wanted to take some time and see what it would be like to take all of these different technologies, put each of them in a Docker container, start up the entire application with docker-compose and then scale each layer.
Be sure to checkout my Plurasight Play by Play w/ John Papa on ASP.NET Core on Any OS here.
Angular 2
The Angular 2 Team has done a great job with their documentation and provided an awesome tutorial called Tour of Heroes developed by John Papa (@john_papa). I grabbed that code from the tutorial and made a few changes in the heroes.service.ts and dashboard.component.ts to change it from Promises to Observables. Why? Because I wanted to get more familiar with using them and, at least for now, the tutorial just returns a static array from a class; I wanted to actually hit an url from an endpoint.
heroes.services.ts - First we will need to import the reactive js module.
import 'rxjs/Rx';
Next in the getHeroes() function we need to change it out to the following to call the /api/heroes endpoint and then use the .map() function to pass the json property (our heroes json) to the subscriber.
getHeroes() {
         return this._http.get('/api/heroes')
            .map( response => response.json() );
    }
dashboard.component.ts - Add the import of the Observable and Subscription classes from the rxjs module.
import { Observable, Subscription } from 'rxjs';
and then the ngOnInit() function needs to be altered to change the Promise implementation of .then() to the Observable method of .subscribe().
ngOnInit() {
    this._heroService.getHeroes()
        .subscribe(heroes => this.heroes = heroes);
}
Finally, since we are going to be using Http, the HTTP_PROVIDERS must be instantiated and put into the dependency injection system.
In app.component.ts add the following import statement and also HTTP_PROVIDERS to the providers:. The constructor in the HeroService class (hero.service.ts) relies on it for calling the web api endpoints.
import { HTTP_PROVIDERS } from 'angular2/http';
...
...
...
 providers: [HeroService, ROUTER_PROVIDERS, HTTP_PROVIDERS]
Creating the container
The docker container is a simple nginx container, where the base image is debian:jessie.
FROM nginx:latest

EXPOSE 8080

COPY src /var/www
COPY conf/nginx.conf /etc/nginx/nginx.conf
The first COPY command copies the application files to the src folder within the container and the next COPY command will replace the default nginx configuration with a new version.
The config is pretty standard with some additions for routing for deep linking and setting the default page.
server {
        listen 80;
        index index.html;
        server_name localhost;
        error_log  /var/log/nginx/error.log;
        access_log /var/log/nginx/access.log;
        root /var/www/public/;

        location / {
           try_files $uri$args $uri$args/ $uri/ /index.html =404;
        }
    }
The important portion of the conf file here is the location line; this line is the "deep link" configuration for the SPA. So if a user browses to http://<server-name>/detail/1 the nginx server will pass this down to index.html to handle if it cannot resolve.
Next, let's look at the ASP.NET Core Web API portion.
ASP.NET Core Web API
This is a pretty basic web api solution. I used the yeoman generator to scaffold the project.
See more about creating applications with generator-aspnet and Yeoman on Creating an Application w/ VS Code and Yeoman or http://github.com/omnisharp/generator-aspnet.
Some of my favorite features are the configuration and dependency injection portions of ASP.NET Core. Using Redis as a cache for the data; a StorageService (Storage.cs) is created for an interface to Redis and added to the middleware pipeline in Startup.cs
StackExchange.Redis is a popular, recommended and fast .NET provider for Redis. However at the time of writing this post, the ASP.NET coreclr version of the provider was not ready. This implementation uses webdis; an http REST interface over Redis.
Adding the Storage Services to the pipeline in ConfigureServices()
// Add Storage Service
services.AddSingleton<Common.IStorage, Common.Storage>();
As a part of using Redis, the server name and port need to be passed into the StorageService. With the new Configuration options now available; the server and port are added to the appsettings.json file.
{
  "Logging": {
    "IncludeScopes": false,
    "LogLevel": {
      "Default": "Verbose",
      "System": "Information",
      "Microsoft": "Information"
    }
  },
  "AppSettings": {
        "RedisServer": "redis",
        "RedisPort":  "7379"
    }
}
and then in Startup() the file can be added into the Configuration and we can also add the use of EnvironmentVariables. This allows for different configurations in DEV, TEST, Prod etc. and note that the last option wins. In this case, Environment variables.
public Startup(IHostingEnvironment env)
{
    // Set up configuration sources.
    var builder = new ConfigurationBuilder()
        .AddJsonFile("appsettings.json")
        .AddEnvironmentVariables();
    Configuration = builder.Build();
}
The AppSettings will also need to be added into the pipeline, just as the StorageService.
services.Configure<AppSettings>(Configuration.GetSection("AppSettings"));
The AppSettings class will be injected into the StorageService class for the Redis server and port number. The Configurations.GetSection() line grabs that portion from the appsettings.json file and then when it is injected into the StorageService class the json is mapped to the AppSettings class using the IOptions interface making it a hard typed class, and the properties are accessible like Settings.Value.RedisServer
AppSettings.cs
public class AppSettings
{
   public string RedisServer { get; set; }
   public string RedisPort { get; set; }
}
StorageService constructor
private IOptions<AppSettings> Settings;
public Storage(IOptions<AppSettings> appSettings)
{
   Settings = appSettings;
}
Data Model
Because this is a quick demo project, generating some quick data was a need but because there is some context needed around the "type" of data we need, I chose to use GenFu (http://genfu.io/) a great .NET library for doing exactly that. The StorageService has a PrimeData() method which loads the data into the Redis container for the web api service to use.
public void PrimeData()
{
      var exists = KeyExists("heroes");
      if (!exists)
      {
          var heroes = A.ListOf<Hero>(); // "A" is GenFu
          heroes.ForEach(async h =>
          {
              if (!string.IsNullOrWhiteSpace(h.SuperName))
                  await AddItemToArray("heroes", h.SuperName);
          });

          SetItem("primed", "true");
      }
}
The TourHero class, the model returned to the client, is essentially a DTO (data transfer object); however when returning this object even as json then casing of the object properties must match when trying to map to the JavaScript object. For instance, mapping Name to name can not happen automatically using the .map() function without some extra work.
In order to make this easier, we can add a single line to the Startup.cs to make the json returned camel cased. Add the following to the .AddMvc() call in ConfigureServices()
services.AddMvc().AddJsonOptions(options => {
                options.SerializerSettings.ContractResolver =
                   new CamelCasePropertyNamesContractResolver();
            });
In doing so will change the return of TourHero from:
{
 "Id": 1,
 "Name": Jumper Guy
}
to
{
 "id": 1,
 "name": Jumper Guy
}
Creating the the container
The yeoman generator creates the docker file for the project when it is scaffolded. However, there are a few changes needed since the goal of the project is run it strictly under coreclr.
First change the base image being used.
FROM microsoft/aspnet:1.0.0-rc1-update1-coreclr
Next, in project.json, we need to set the server url that is exposed for the application. If you run the web api application locally, by running dnx web, you'd typically browse to http://localhost:5001/. However when running the app within a docker container you cannot get to "localhost" from another container. So, in the commands section add the --server.urls to expose all IPs on port 5001 for the app.
"commands": {
    "web": "Microsoft.AspNet.Server.Kestrel --server.urls http://0.0.0.0:5001"
  },
This completes the setup of the ASP.NET Core Web API and making it Docker ready.
Redis / Webdis
Redis is a uber fast memcache key/value store. In this project we are using it as a way to store the Hero data.
Webdis is an http REST interface that allows for communication to the Redis store. For instance we can SET and GET a key "Hello" with a valueof "Word" this way.
http://192.168.99.100:3739/SET/Hello/World

http://192.168.99.100:3739/GET/Hello
returns:
{
  "GET" : "World"
}
This is only a "band aid" solution for now as the StackExchange.Redis provider for coreclr is not complete.
Both of theses components are running inside a single Docker container.
Docker & docker-compose
Each of these pieces can be started by using docker to create and/or pull the image and then start the container. For instance, to we could execute the following commands to:
- Build the webapi image
- Pull and start the redis/webdis container
- Start the web api image
$ docker build -t webapi /webpi
$ docker run -d -p 7379:7379 -e LOCAL_REDIS=true anapsix/webdis
$ docker run -d --name "webapi" -p 5001:5001 webapi
Then browse to the IP of the docker machine, typically 192.168.99.100/api/heroes to see the api return.
But executing the 3 commands doesn't emulate a scenario of production, nor does it allow for a seamless scaling solution should we need to scale the webapi layer per se.
This is where docker-compose comes in. Using a docker-compose.yml file we can define multiple containers, link them which allows for the underlying networking stack to be established, as well as setting environment variables for each container.
Let's build a docker-compose file for this solution taking each container one by one.
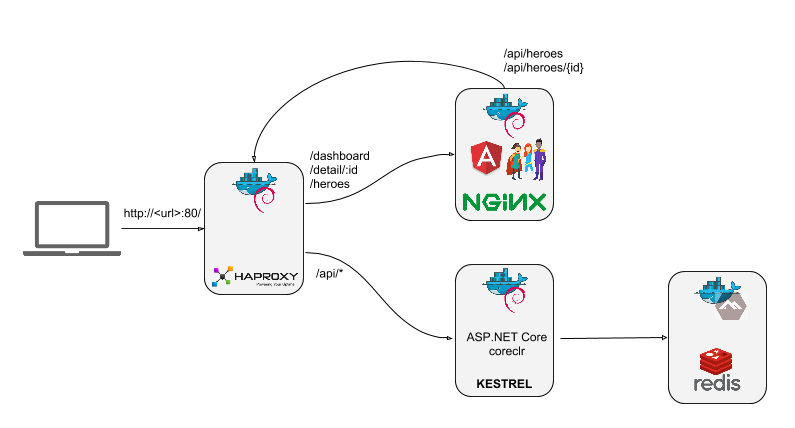
First, the Angular 2 application. We are telling compose to build the image using the DockerFile from the /web directory. Then defining an environment variable of VIRTUAL_HOST with a value of */*. This is telling the HAPROXY to route and request to the Angular2/nginx container.
web:
  build: web
  environment:
    VIRTUAL_HOST: "*/*"
Second, the ASP.NET Core Web API Application. We are telling compose to build the image using the DockerFile from the /webapi directory. Then defining an environment variable of VIRTUAL_HOST with a value of */api, */api/*. This is telling the HAPROXY to route and request to this container. Finally, there is a link item that sets up the networking to the next container, redis, so we can call it from the webapi container by name.
webapi:
  build: webapi
  environment:
    VIRTUAL_HOST: "*/api, */api/*"
    ASPNET_ENV: Development
  links:
    - redis
The redis container is a slight bit different in since that the image is being pulled from hub.docker.com and not built as in the web and webapi. Compose will first look locally for the image, if it is not found will then go to the registry to pull it. An environment variable is set to install the redis server within the container and ports are exposed.
redis:
  image: anapsix/webdis
  environment:
    LOCAL_REDIS: true
  ports:
    - "7379:7379"
Finally, the load balancer image "lb" is another image tutum/haproxy being pulled from the docker hub. I am using this one because it it ready out of the box to with some networking and proxy "stuff" that I do not need to know how to setup but "just use". links are set to the web and webapi containers, and finally ports 80 is defined for the entry point.
lb:
  image: tutum/haproxy
  links:
    - web
    - webapi
  ports:
    - "80:80"
This is the complete docker-compose.yml file.
web:
  build: web
  environment:
    VIRTUAL_HOST: "*/*"
webapi:
  build: webapi
  environment:
    VIRTUAL_HOST: "*/api, */api/*"
    ASPNET_ENV: Development
  links:
    - redis
redis:
  image: anapsix/webdis
  environment:
    LOCAL_REDIS: true
  ports:
    - "7379:7379"
lb:
  image: tutum/haproxy
  links:
    - web
    - webapi
  ports:
    - "80:80"
To start the full application, use docker compose and execute:
$ docker-compose up -d
Creating haproxyplayground_web_1...
Creating haproxyplayground_redis_1...
Creating haproxyplayground_webapi_1...
Creating haproxyplayground_lb_1...
to see what is running use docker-compose ps
$ docker-compose ps
           Name                      Command           State                   Ports
----------------------------------------------------------------------------------------------------
haproxyplayground_lb_1       python /haproxy/main.py   Up      1936/tcp, 443/tcp, 0.0.0.0:80->80/tcp
haproxyplayground_redis_1    /entrypoint.sh            Up      0.0.0.0:7379->7379/tcp
haproxyplayground_web_1      nginx -g daemon off;      Up      443/tcp, 80/tcp, 8080/tcp
haproxyplayground_webapi_1   dnx -p project.json web   Up      5001/tcp
-druns it in detached mode. And now browse to http://192.168.99.100 You can find the IP Address of your docker-machine by usingdocker-machine IP default
If you want to scale the web app up to 3 instances, we use the docker-compose scale web=<instances> command
$ docker-compose scale web=3
Creating and starting 2... done
Creating and starting 3... done
Now run the docker-compose ps to see the instances
$ docker-compose ps
           Name                      Command           State                   Ports
----------------------------------------------------------------------------------------------------
haproxyplayground_lb_1       python /haproxy/main.py   Up      1936/tcp, 443/tcp, 0.0.0.0:80->80/tcp
haproxyplayground_redis_1    /entrypoint.sh            Up      0.0.0.0:7379->7379/tcp
haproxyplayground_web_1      nginx -g daemon off;      Up      443/tcp, 80/tcp, 8080/tcp
haproxyplayground_web_2      nginx -g daemon off;      Up      443/tcp, 80/tcp, 8080/tcp
haproxyplayground_web_3      nginx -g daemon off;      Up      443/tcp, 80/tcp, 8080/tcp
haproxyplayground_webapi_1   dnx -p project.json web   Up      5001/tcp
And you can see that there are now 3 instances of the web application, 1 of the webapi.
Shutting them all down is easy with docker-compose stop and removing the containers with docker-compose rm.
Wrapping Up
Being able to select the various technologies you want to use, independently deploy and scale them is where you ultimately strive to be in any application development and deployment plan. Here I was able to use Angular 2, ASP.NET Core Web API, Redis, haproxy, and ngnix to create an end-end application in a development environment that would ultimately emulate TEST, QA and Production environments in this scenario. Scaling of the application can be accomplished using Docker Swarm or Mesos with a similar .yml or .json configuration file as we had in the docker-compose file should you need that in your cloud provider.
Resources
- github repo - https://github.com/spboyer/haproxy-playground
- Angular 2 - http://angular.io
- Tour of Heroes tutorial - https://angular.io/docs/ts/latest/tutorial/
- Docker - http://docker.com
- ASP.NET Core - http://get.asp.net